1,项目安装
|
|
composer require --dev phpunit/phpunit |
全局安装
|
|
composer global require --dev phpunit/phpunit |
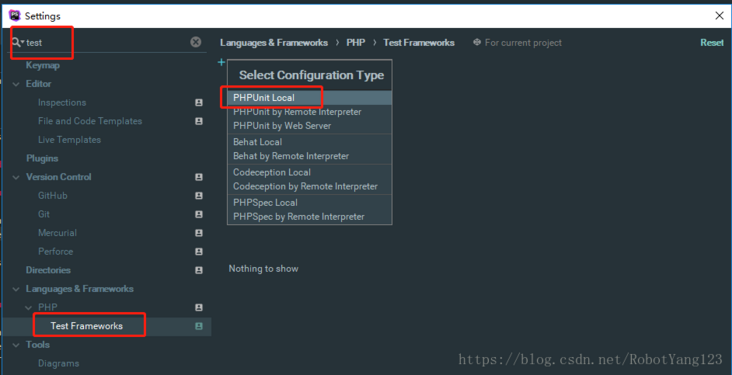
2,配置 PHPUnit
选择 File -> Setting,搜索 test ,左侧选择 Test Framework,点击 + 新增一个 PHPUnit Local。
- Composer Library 项目
- 选择第一项:使用
composer autoloader 导入配置
- 选择你项目下的
vendor/autoload.php
- 点击那个
同步的小图标,如果看到 successfully 就说明配置有效
3,配置 phpunit.xml
- 在你的项目根目录下新建
phpunit.xml 文件(但奇怪的是我在 PhpStorm 删除这个文件,也可以执行单元测试,猜测可能是 phpunit.xml 配置文件是可选的)
1 2 3 4 5 6 7 8 9 10 11 12 13 14 15 16 17 18 19 20 21 22 23 24 |
<?xml version="1.0" encoding="UTF-8"?> <!--bootstrap指定启动测试时, 先加载vendor/autoload.php--> <phpunit backupGlobals="false" backupStaticAttributes="false" bootstrap="vendor/autoload.php" colors="true" convertErrorsToExceptions="true" convertNoticesToExceptions="true" convertWarningsToExceptions="true" processIsolation="false" stopOnFailure="false"> <!--testsuite指定测试文件的目录--> <testsuite> <directory suffix="Test.php">./tests</directory> </testsuite> <!--filter过滤依赖文件的位置--> <filter> <whitelist processUncoveredFilesFromWhitelist="true"> <directory suffix=".php">./src</directory> </whitelist> </filter> </phpunit> |
- 当然这个 phpunit.xml 只是基本配置,还有其他高级配置请自行百度
4,新增测试
- 在你的项目根目录下新建
tests 目录
- 在
tests 目录下新建 phpunit 测试类,以 Test.php 为后缀
- 测试类命名:
类名 + Test , eg FooClassTest
- 测试方法命名:
test + 方法名 , eg testFoo

来源:
配置:https://segmentfault.com/a/1190000016323574
demo:https://learnku.com/articles/22072
「三年博客,如果觉得我的文章对您有用,请帮助本站成长」
admin(6年前 (2020-03-09))
admin(6年前 (2020-03-09))
admin(6年前 (2020-03-09))
一位WordPress评论者(6年前 (2020-02-13))
共有 0 - Phpstorm 使用 phpunit单元测试